How to Replace a Print Server in a Branch Office with ThinPrint Hub
Have you ever thought about how much your remote locations’ print servers cost your organization to maintain? The reality is that between OS, upkeep, trouble tickets, and electricity, your branch print servers cost several thousand dollars each year. With the ThinPrint Hub, you can better centralize your print management, accelerate printing speeds, improve user confidence, be more eco-friendly, and dramatically improve the bottom line.
How it works
In order to make this savings and simplification, we’ll leverage many ThinPrint benefits and features, firstly driver-free printing at your branch’s workstations. To prepare, migrate your existing print queues from the branch print server to your ThinPrint Server using your preferred method (ThinPrint offers a management solution to help you do this too!).
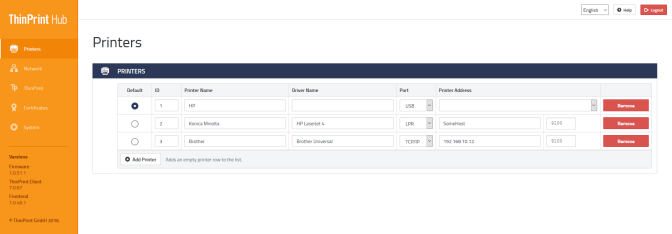
Next we’re going to quickly and easily configure the ThinPrint Hub to connect to the native drivers on your ThinPrint Server. Log in to your Hub’s web interface (refer to the ThinPrint Hub Quickstart Guide for more granular instructions) and add the name(s), port(s), and printer address(es) (FQDN or IP address) for the corresponding printers that you’re using at the branch location. Be sure to record each Printer ID for easy reference in the next step!

List of printers in the ThinPrint Hub Interface
After these two steps, we simply rename the print queue(s) to be directed to the ThinPrint Hub. You can use a PowerShell script or manually adjust your print queue names to ‘point’ the finished jobs back at the ThinPrint Hub.
You can now share your UNC paths on your central ThinPrint Server to any and all users in your organization. Users can print to these queues like any other, but with the added benefits of ThinPrint’s compression, bandwidth control, driver-free workstations, and encryption. Once a finished job arrives at the Hub, the embedded software will decompress (and optionally decrypt) your print job to send the remaining distance to the physical printer.


