VPN-Free Branch Office and Field Office Printing
In this blogpost we will explain how to enable the ThinPrint Secure Tunnel with the ThinPrint Hub.
The ThinPrint Hub is already know by some of you from previous blog entries. For the newcomers though, the ThinPrint Hub combined with the ThinPrint Engine allows you to eliminate local print servers without any of the disadvantages associated with losing them. There are even a number of advantages that you gain in the process. You no longer have to maintain printer drivers on numerous print servers, instead there is only one print server at a central location.
In this article, I’ll show you how to integrate even those printers that are hidden behind a masked network, even in locations without VPN.
Integrating branch office printing without VPN
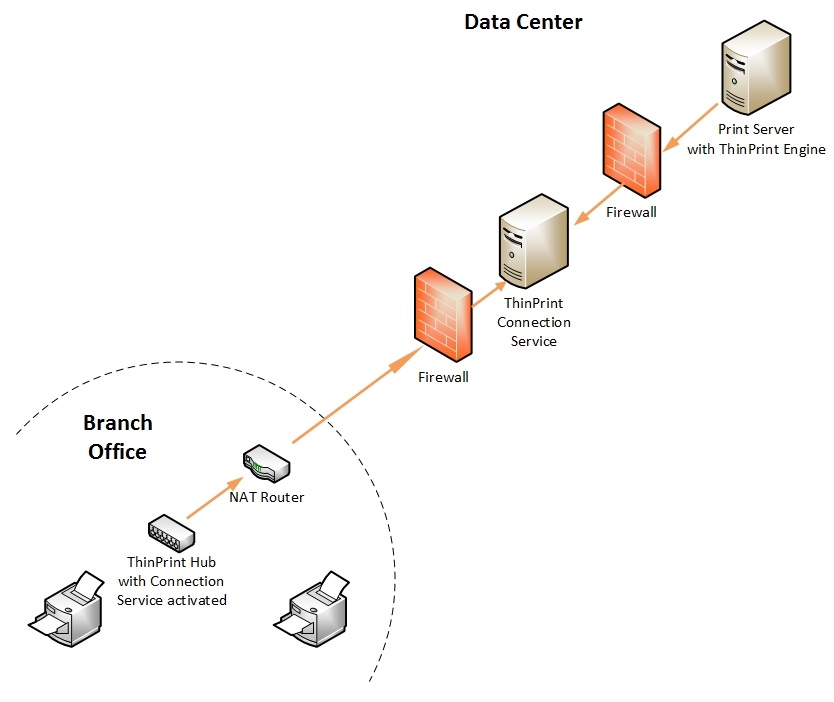
At most remote sites, companies use masked networks, and a VPN tunnel would be needed to address printers. This is not necessary with ThinPrint as this is where the ThinPrint Secure Tunnel takes over, specifically for printing. The ThinPrint Connection Service creates a secure communication link, the ThinPrint Secure Tunnel, from the ThinPrint Hub in the branch office to the central ThinPrint printing system in the data center.
Via this tunnel, print jobs are transmitted to branch offices and then distributed to the network printers by the ThinPrint Client (for example a ThinPrint Hub). No direct connection from the central ThinPrint Engine to the printers is necessary and the ThinPrint Engine doesn’t need to know the IP address of the printers in the branch offices. In addition, print data can be transferred securely through TLS/SSL-encryption. Print jobs often contain highly sensitive data and should be just as protected as confidential documents.
Components:
There are several ways to set up the ThinPrint Secure Tunnel for branch office printing. In this article I’ll show a best practice installation involving a ThinPrint Hub and a DMZ:
- 1 Windows 2008 or later print server, with an installed ThinPrint Engine
- 1 Windows Server 2008 R2 (or later) in the demilitarized zone (DMZ) with an installed .NET Framework 3.5 and ThinPrint Connection Service
- 1 ThinPrint Hub (version 1.0.54 or newer)
How to enable VPN-free branch office printing with ThinPrint Hub and ThinPrint Connection Service
Configuring the ThinPrint Secure Tunnel for branch office printing
After installing the ThinPrint Connection Service on the Windows server in the DMZ, a snap-in is available for the Microsoft Management Console to configure the ThinPrint Connection Service. Here, print servers which are destined to print via the ThinPrint Secure Tunnel, can be authorized. To do so, add the IPv4 addresses in the settings. By default, print jobs are permitted by all print servers. I recommend however to limit this to the necessary print servers.
The ThinPrint Client connections are also stored, i.e. an ID and an authentication key are assigned to each client. This ID is used to name the printers so that the Connection Service is informed of the printer to be addressed for each print job.
The syntax is as follows: Printer name#Client ID:Printer ID (example: HP-CP3505#56:1)
Client ID = Assigned in the Connection Service configuration
Printer ID = Assigned on the ThinPrint Hub
In order for the server in the DMZ to communicate with the clients in the branch offices and the print servers in the control center, the 4000 and 4001 ports must be opened inbound.
Configuration of the Print Server
Normally, several simple ThinPrint ports are sufficient in order to print with ThinPrint. However, if you want to use the ThinPrint Secure Tunnel, select the ThinPrint Connection Service Port in the ThinPrint Port Manager. If you open its properties, only the internal address of the Connection Service should be stored for the default configuration.
Tip: It’s best to create several of these ports per branch office and activate port pooling. This prevents a print job that gets stuck from blocking the entire branch office.
Configuration of the ThinPrint Hub
Last but not least to be configured is the ThinPrint Hub. To complete this, open the web console of the ThinPrint Hub, log in, and go to the ThinPrint section of the menu on the left of the screen. Once there, place a checkmark at the Connection Service, which automatically then activates the service.
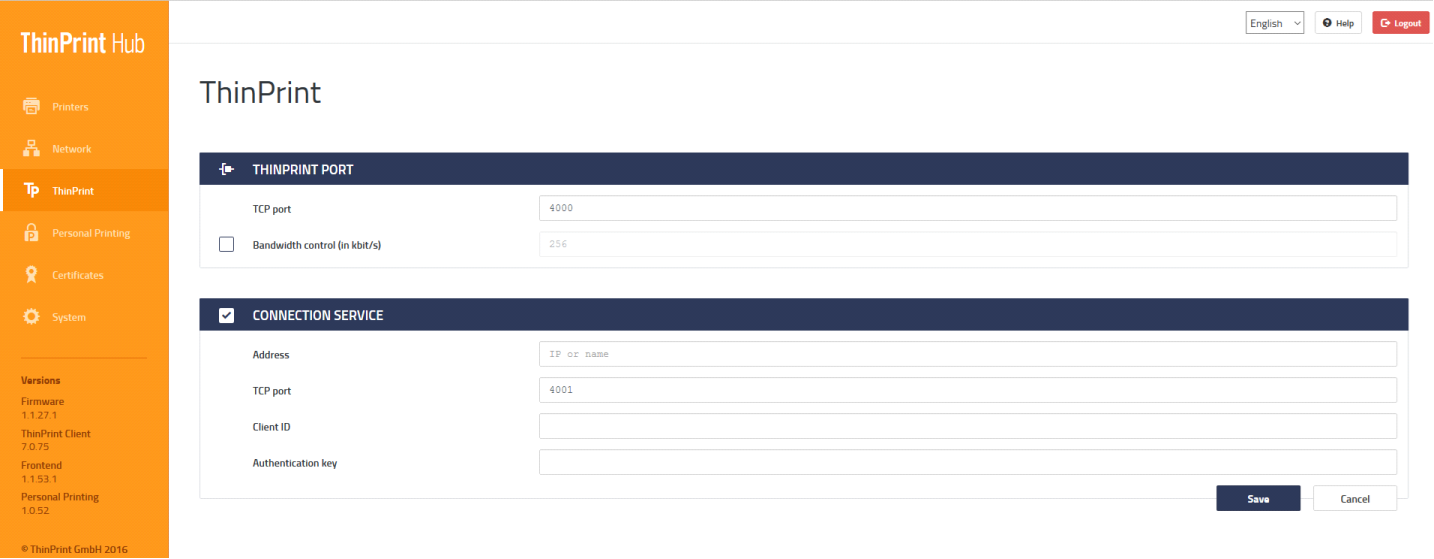
The web console of the ThinPrint Hub
The external address of the Connection Service must be specified as the address. The port can be modified, but it must then also be updated on the server side of the Connection Service to enable a seamless connection. The last step is to specify the client ID for this ThinPrint Hub as well as the associated authentication key.
You can see whether a connection from the client to the Connection Service has been established in the Connection Service Management Console. At the Connections section you can see that the relevant client is marked as connected.
Result:
If these steps have been followed, then the ThinPrint Hub contacts the Connection Service and ensures that the connection remains intact. This allows you to connect printers in branch offices or other remote locations, with a highly-secure architecture with masked networks, multiple firewalls and DMZ, without the need for a VPN. Finally, if required, data transmission can be fully encrypted providing an additional layer of security.